How to Start a WordPress Blog for Beginners
Have you always wanted to start your own WordPress blog but aren’t sure where to begin? The idea can be daunting, but it’s easier than you think!
Whether it be a food blog, portfolio, or fansite, websites are an incredible way to share your passions with the world and engage with others who share your interests. You can also monetize your site and make serious money! It’s a win-win!
Using the free, open-source WordPress.org platform and the fan-favorite Bluehost webhosting provider, we’ll help you launch your first site in just a matter of minutes. No coding or experience required! Ready? Let’s go!
Here’s what we’ll go over below:
- Choose your website’s domain name
- Sign up for web hosting
- Installing WordPress
- Choosing & installing a WordPress theme
- Quick intro to your WordPress Dashboard
This guide is for the WordPress.org platform, not WordPress.com
Confused? Check out: What’s the Difference Between WP.org and WP.com?
1. Choose a domain name
A domain name is your website’s unique URL. For example, our domain name is solopine.com.
Try choosing one that’s relevant to your intended site content and not too complicated. Upon deciding on a domain name, search for it online to ensure it’s not already taken by someone else. Found one? Great! Now onto the next step.
2. Choose a hosting plan
Web hosting is similar to renting a storage space where you’ll keep all of your site’s files. A good web host is essential to a successful website.
We personally recommend the web hosting service Bluehost*.
*Please note: we may include referral links to services in our articles. Any sign ups we potentially send their way may result in us receiving an affiliate commission. We only refer services or products to our readers which we stand behind 100%.
We believe that Bluehost is one of the more affordable and reliable hosting options. Bluehost is the #1 recommended web hosting partner by WordPress.org, offers a 1-click WordPress install option, and includes freebies other hosts charge for. It doesn’t get much easier than that!
And, in special partnership with Bluehost, we’re now able to offer folks a wildly low rate of just $2.95/month if you enroll via one of our Bluehost links!
You’ll receive a great hosting package, a free domain, and other helpful tools.
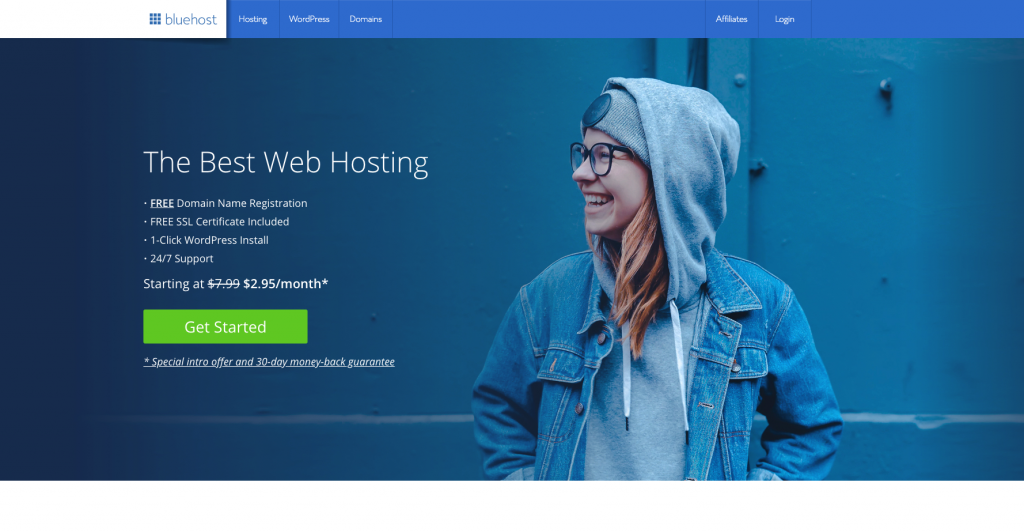
We’ll go over an example of signing up for a hosting plan with Bluehost to show just how simple it is.
SIGNING UP WITH BLUEHOST
From their home screen, click the big green “GET STARTED” button.
Next, choose your desired hosting plan.

Bluehost offers a number of hosting plans to suit every need. The most affordable option is the “Basic” plan. Most sites, especially if you’re just starting out, will find that the “Basic” plan is a great fit and excellent value. You can always upgrade in the future if you feel the need to.
Below are the current plan prices as of December 2019:
BASIC PLAN
- 12 month: $4.95/mon (total of $59.40)
- 24 month: $3.95/mon (total of $94.80)
- 36 month: $2.95/mon (total of $106.20) best value!
PLUS PLAN
- 12 month: $7.45/mon (total of $89.40)
- 24 month: $6.95/mon (total of $166.80)
- 36 month: $5.45/mon (total of $196.20) best value!
PRIME PLAN
- 12 month: $7.45/mon (total of $89.40)
- 24 month: $6.95/mon (total of $166.80)
- 36 month: $5.45/mon (total of $196.20) best value!
If you’re new to the website neighborhood, it’s most likely that the Basic plan is all you need.
TIP: To secure the lowest price,
opt for the 36-month hosting package which locks in the best rate!
Next, remember that awesome domain name you chose? Enter it within the “New Domain” box. It’s free to register it with Bluehost!
If you already have an existing domain name you’d like to use, you can enter it into the “I have a domain name” box.
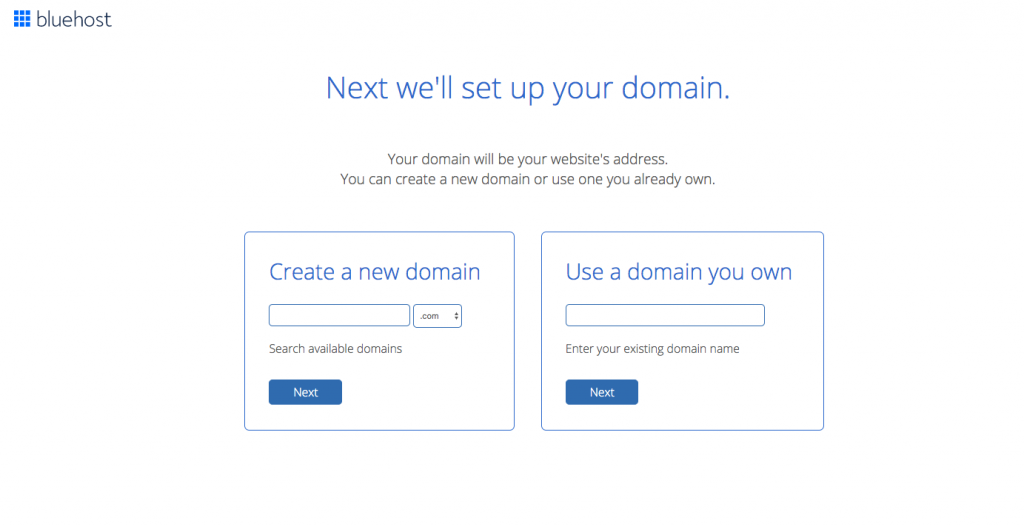
Finalize your hosting plan and choose any optional add-ons that appeal to you.

You’re all set! It’s that easy.
3. Installing WordPress
Now that you have your web host in order, you can install the WordPress.org platform. Bluehost offers a “1-Click Install” tool which makes installing WordPress a piece of cake.
When you first login to your new Bluehost account, you can take a tour of the dashboard area to familiarize yourself with it. It will then offer you the option of assigning your domain.
Once that’s finished, you can click the “install wordpress” button at the top of the screen.

You’ll be taken to a “New Install” screen. Here, you can choose the username and password used to log into your WordPress Dashboard and provide an email address.
When finished, click the green “Install WordPress” button.
4. Choosing a Theme for Your WordPress Blog
We’re almost there! Can’t you smell that new-site scent?
The last step is choosing a WordPress theme for your website. Themes are incredible tools which not only change the appearance of your site but offer different features. When browsing for a theme, keep in mind what your website will be about and how you’d like to showcase your content.
FREE WORDPRESS THEMES
As soon as you install WordPress, you’ll automatically have their latest free theme activated on your site. Your website is essentially ready to go this very second!
WordPress.org comes with several free themes and has a directory of third-party free themes that you can install and activate immediately. Keep in mind that you do get what you pay for. Free themes are generally very simple, don’t offer technical support, and are light on features.
PREMIUM THEMES
Alternatively, there are online marketplaces which offer premium themes you can purchase. These premium themes will be packed with loads of great features, technical support, and more.
SOLO PINE THEMES
At Solo Pine, we design and develop responsive, flexible blog themes for any genre and style. We’ve proudly helped thousands of WordPress beginners since 2013.
A one-time Solo Pine theme license purchase is good for life– no subscriptions! And all of our themes come with 6 months of our legendary technical support coverage for FREE so we can make sure you’re on your way to website success.
Whether a WordPress beginner or master, we’re here to help!
A WORDPRESS THEME FOR EVERY PASSION
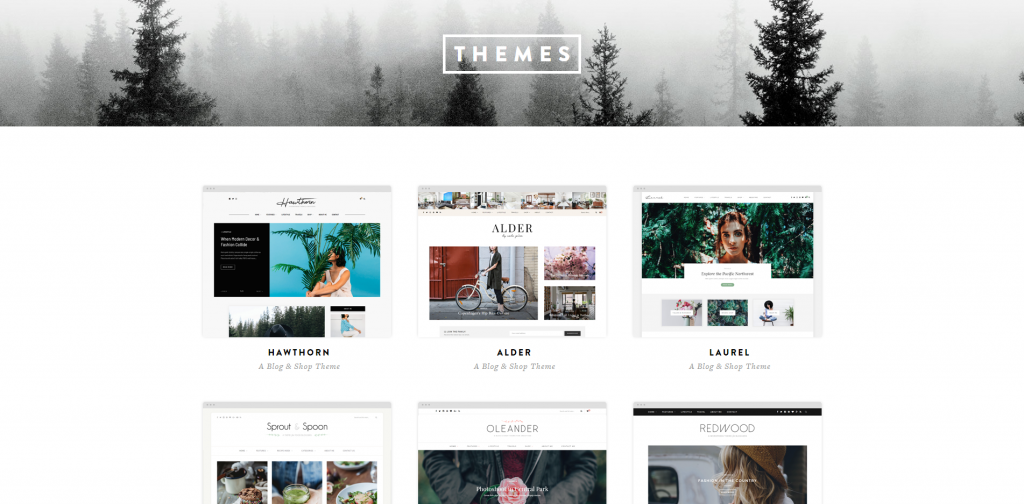
Solo Pine currently has 10 WordPress blog themes crafted to handle nearly any content genre you can dream up:
HEMLOCK: A clean yet visually arresting blog theme, Hemlock is a perfect partner in presenting your content with contemporary class.
FLORENCE: Florence is a bright and airy theme for those who love crisp presentation, loads of customization options, and a straight-forward blogging experience.
ROSEMARY: Rosemary is a light & bright WordPress blog theme, tailored to showcase your content in an effortlessly timeless style.
REDWOOD: Boasting a bold, fresh design and bountiful features, like its striking slider and promo boxes, Redwood is guaranteed to make an impact.
OLEANDER: With clean lines, loads of lovable features, and the option to create your own web-shop, Oleander is the perfect blend of form & function.
SPROUT & SPOON: Whipped up with food bloggers in mind, Sprout & Spoon is packed with foodie features guaranteed to make you drool (maybe just a little)!
LAUREL: Pack a visual punch with Laurel’s variable Featured Image sizes and create vibrant category indexes. The perfect balance of polish and wow.
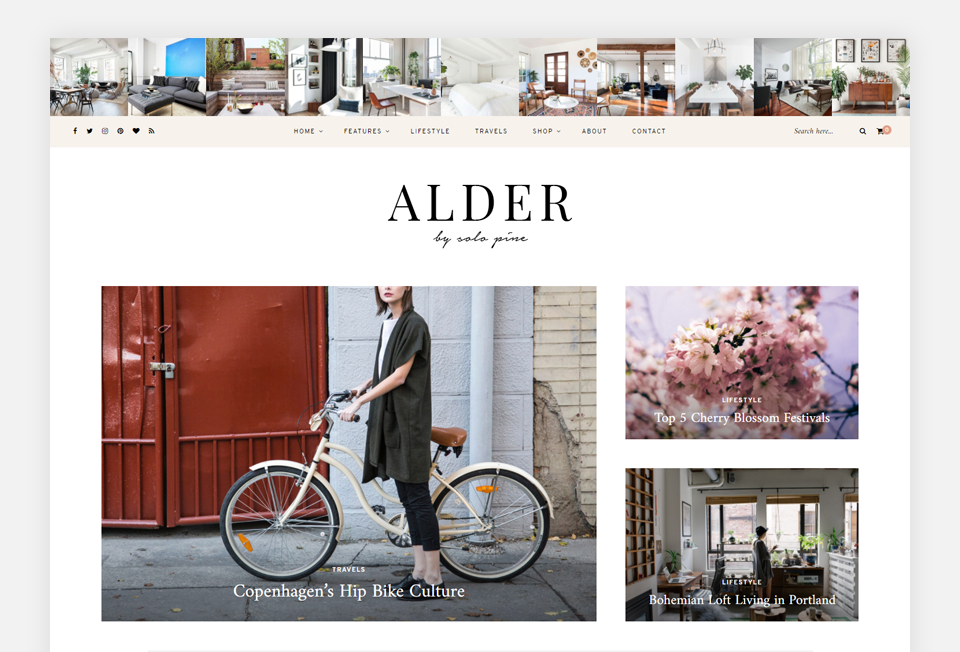
ALDER: Alder’s clean & classy look lends a structured elegance to any content. You bring your vision & voice, Alder will take care of the rest!
HAWTHORN: Striking and versatile Hawthorn packs a serious punch regardless of your content genre.
SITKA: Chock-full of customization options yet effortlessly intuitive, Sitka is our most powerful theme yet.
All of the themes are customizable and offer a plethora of exceptional features, not to mention their responsive design and top-notch tech support guarantee.
5. Installing A WordPress Theme
Have a theme picked out for your WordPress blog? Great!
Below, we’ll go over how to install and activate a free WordPress theme and a premium WordPress theme (a theme that you’ve paid for).
HOW TO INSTALL A FREE WORDPRESS THEME
From your WordPress Dashboard, navigate to Appearance > Themes via your your left dashboard panel. This screen will show you all the themes that are currently installed on your WordPress. By default, WordPress comes with a few pre-installed default themes such as “Twentytwenty”.
You can either click the large “Add New Theme” box to the right of the installed themes, or, click the “Add New” button toward the top of the page.
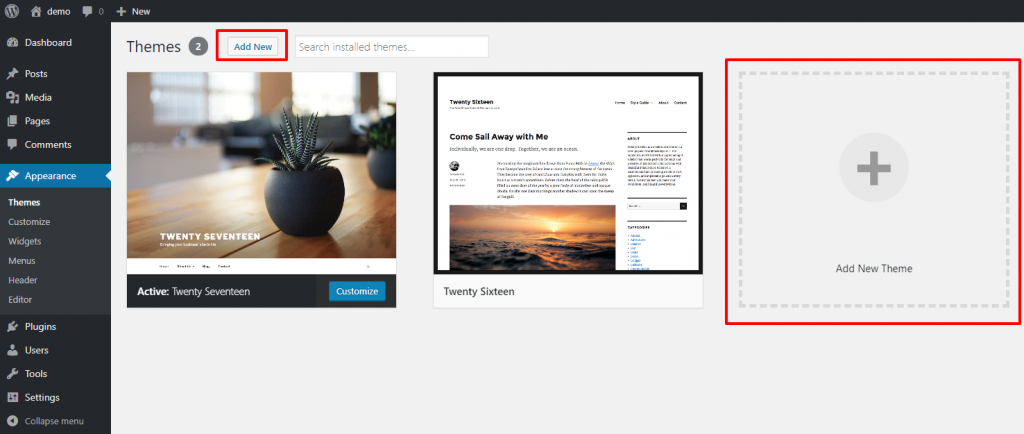
Here, you can browse through all of the free themes on the WordPress Theme Directory. Use the tab links at the top of the screen to sort the themes by “Featured”, “Popular”, or “Latest”.
To preview a theme in order to see how it may look on your website, you can hover over the theme’s image and select the “Preview” button. When you find a theme you’d like to use, hover over the theme’s image and select the “Install” button.
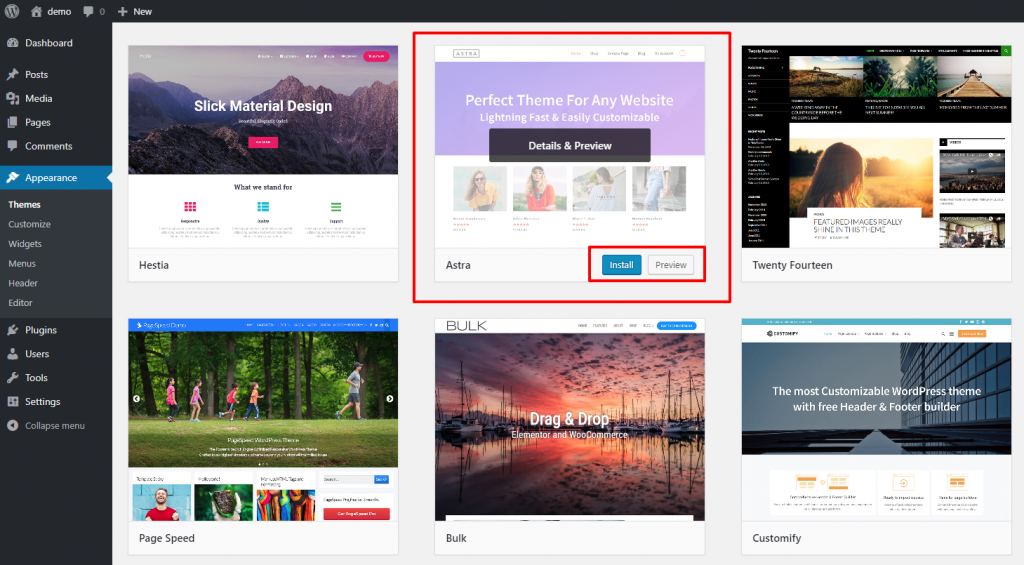
Now that the theme is installed on your WordPress, the last step is to “Activate” it. You can have many themes installed on your WordPress, but only the theme which is currently “active” will be applied to your website.
To activate your theme, navigate to WP Dashboard > Appearance > Themes. Hover your cursor over the theme image, and click the “Activate” button.
To view the new theme on your website, click the little house icon in the very top-left of your WP Dashboard.
HOW TO INSTALL A PREMIUM WORDPRESS THEME
While similar, the process of installing a theme you’ve paid for and downloaded is a bit different.
When you purchase a theme license from a marketplace such as Creative Market* or ThemeForest*, you’ll be able to download the theme package to your computer. Be sure to reference the theme author’s documentation resource for installation instructions as how the theme is packaged may vary. However, it will likely come downloaded in a zipped folder. Generally, you’ll need to unzip this first folder in order to access the actual theme zip folder within.
Navigate to WP Dashboard > Appearance > Themes. Select the button titled “Add New” in the top-left of the screen or click the “Add New Theme” box.
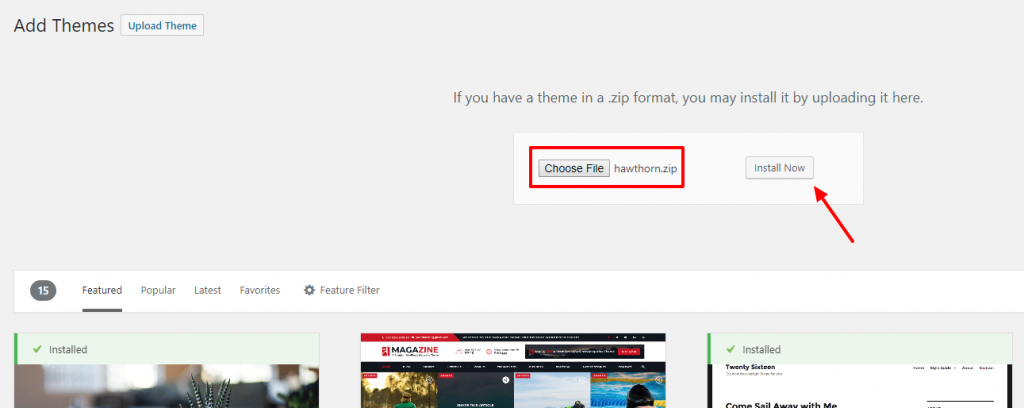
Then, select the button titled “Upload Theme” in the top-left of the screen. From here, click the “Choose File” button and locate where the zipped theme package is on your computer. The name of the zipped file may vary from author to author, however it’s usually titled with the theme’s name (example: “theme.zip”).
When finished, click the “Install Now” button.
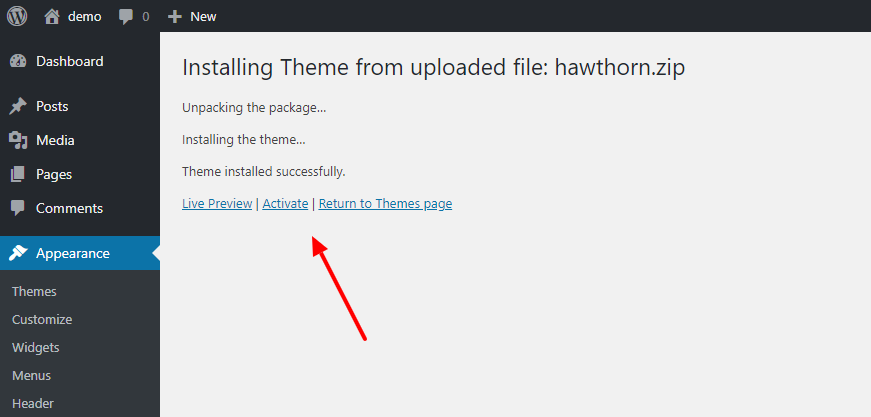
WordPress will work its magic installing all of the theme files to your setup. Once it’s finished, you’ll be given 3 options: “Live Preview”, “Activate”, and “Return to Themes page”.
To apply the theme to your website and access its Customization settings, click the “Activate” link. Otherwise, you can also activate the theme by navigating to WP Dashboard > Appearance > Themes, hovering your cursor over the theme image, and selecting the “Activate” button.
Seeing “The package could not be installed. The theme is missing the
style.css stylesheet.” error message? You’re likely just uploading the wrong zipped folder to your WordPress.
6. Quick Intro to your WordPress Dashboard Area
The WordPress Dashboard is your command center. Here, you can create content for and manage your website and WordPress installation. Below, we’ll touch on the main components of the WordPress Dashboard.
We highly encourage you to take some time and simply explore– it may seem like a lot to grasp at first, but you’ll master the dash in no time!
For a more in-depth guide of your WordPress Dashboard, check out the WordPress Codex.
Anatomy of the Dashboard
When you first login to your WordPress Dashboard area, you’ll be greeted with the main Dashboard screen. All administrative screens such as this will include a Toolbar at the top, the navigation panel to the left, and the work area.
The Toolbar is the narrow bar that runs across the top of your Dashboard. It is visible whenever you are logged, even if you’re viewing your website. Via the Toolbar (from left to right), you can:
- Access WordPress resources
- View your website
- View and manage your website’s comments
- Quickly create a post or page, add media, or manage your WP users
- Manage your WP profile settings or log out of the WP Dashboard
Posts
Posts take on a variety of forms — text, gallery, audio file, video, etc. — and, when published, appear in a feed where visitors can scroll through them in chronological order.
Select the “Posts” link in the main navigation panel on the left to view your “All Posts” screen. Here, every post (whether published or drafted) will be listed.
You can view, edit, or delete individual posts quickly by hovering over the post title. Links will appear beneath it offering a number of management options. The “Quick Edit” link allows you to alter a variety of the post’s aspects without leaving the “All Posts” screen. To manage multiple posts at once, use the “Bulk Actions” tool. Check the box next to the posts you want to edit and then select your Bulk Action option from the drop-down menu.
To create a new post, select the “Add New” button from your “All Posts” screen.
Via the post’s edit screen, you can:
- Give the post a title
- Enter content into the post body using the WordPress Gutenberg content blocks (click the little ” + ” icon to add a block)
- Save a draft of your post to edit later or publish the post when you want it to appear on your live website
- Choose from a variety of post formats
- Create and assign categories to your post (an important way to add classifications to your posts)
- Add tags (essentially keywords) to your posts
- Add a Featured Image to the post
Media Library
Accessed via the “Media” link in the navigation panel on the left, this is your Media Library. It’s where any images, videos, or audio files you use in your website will be archived. You can view them all in a Grid or List layout and sort them by upload date.
Add files to your Media Library using the “Add New” button within the Media Library screen, or, by using the “Add Media” button when editing a post or page.
Clicking on an item in your Media Library will open its “Attachment Details” pop-up. Here, you can view information about the media file, assign it meta details like a caption or alternative text, and reference its hosted URL.
Pages
Pages are similar to Posts in how they’re created however, while posts will be published in a feed in chronological order, pages exist on their own without any order. Think of a “Contact Us” or “About me” page.
Select the “Pages” link in the main navigation panel on the left to view your “All Pages” screen. Here, every page (whether published or drafted) will be listed.
You can view, edit, or delete individual pages quickly by hovering over the page title. Links will appear beneath it offering a number of management options. The “Quick Edit” link allows you to alter a variety of the page’s aspects without leaving the “All Pages” screen. To manage multiple pages at once, use the “Bulk Actions” tool. Check the box next to the pages you want to edit and then select your Bulk Action option from the drop-down menu.
To create a new page, select the “Add New” button from your “All Pages” screen.
Via the page’s edit screen, you can:
- Give the page a title
- Enter content into the post body using the WordPress Gutenberg content blocks (click the little ” + ” icon to add a block)
- Save a draft of your page to edit later or publish the page when its finished
- Add a Featured Image to the page
Menu
Via Appearance > Menus, you can construct your site’s navigation menu. All themes will offer at least one navigation menu where you can insert links to various locations on your website. Some themes may offer more than one menu.
You can create a new menu by clicking the “create a new menu” link and then give it a title.
On the left side of the Menus screen, there are a handful of drop-down sections for various types of menu items to add.
The menu options are:
- Pages: All of your published pages will be listed here
- Posts: All of your published posts will be listed here
- Custom Links: Create any link you’d like by inserting the link text and the linking URL
- Categories: All post categories you’ve created will be listed here. Linking to a category will automatically create a category archive page where all posts assigned with that particular category will be shown.
- Tags: All post tags you’ve assigned will be listed here. Linking to a tag will automatically create a tag archive page where all posts assigned with that particular tag will be shown.
Menu Settings
In the “Menu Settings” section, you can choose to have any page you publish automatically be added to your navigation menu and you can designate your menu location(s).
The “Display location” option refers to where your menu will appear on your site. If your theme has more than one navigation menu location (for example, a menu in the header and another menu in the footer), you can assign the menu you’ve just created to whichever location you wish. You can create multiple unique menus if you have multiple menu locations to apply them.
Widgets
Widgets are little gadgets you can add to a sidebar or other applicable area to display information, links, images, and more. WordPress comes with over a dozen default widgets for you to choose from including widgets to list post categories, your latest published posts, or display an image of your choosing. Themes and plugins can add more widget options.
Via Appearance > Widgets, you can drag & drop your desired widget from the list on the left into a widget area (a designated area of your theme/website which can accept widgets) on the right. Once placed in the widget area, click the widget heading to open its settings panel. You can drag & drop widgets above or below one another.
Plugins
Plugins are powerful little tools to add functionality or features to your WordPress theme. The WordPress Plugin Directory offers loads of free plugins or you can purchase a premium plugin from online marketplaces.
Select the “Plugins” link in your main navigation panel to see a list of plugins that are installed on your WordPress. Using the links beneath the plugin heading, you can manage plugins in a variety of ways.
General Plugin Options
- Activate: A plugin can be installed but not yet activated. To enable the plugin, be sure to click the “Activate” link.
- Deactivate: Disable a plugin to remove its additions to your WordPress.
- Delete: You will need to deactivate a plugin prior to deleting it.
- Settings: View the plugin’s setting screen.
- Plugin author: Link will direct you to the author/creator’s webpage
- More information: A pop-up will appear with more details.
To manage multiple plugins at once, use the “Bulk Actions” tool. Check the box next to the plugins you want to manage and then select your Bulk Action option from the drop-down menu.
Add a New Plugin
To add a new plugin, select the “Add New” button. Here you can browse the WordPress Plugin Directory for free plugins, or use the search field to search for a specific feature or subject. When you find a plugin you want to use, click its “Install” button. Once it has finished installing, click the “Activate” button. You can also upload premium (or purchased) plugins by clicking the “Add New” button and then clicking the “Upload Plugin” button.
Users
Users are people who are authorized to access and manage different parts of your WordPress Dashboard depending on which sort of “Role” is assigned to them.
To create a new user, click the “Users” link in your main navigation panel and then select the “Add New” button. Insert the required information such as Username and Password, generate a password, and choose a Role for them.
User Options
- Administrator: The Role with the most capabilities. Administrators have no limitations in accessing or managing the website.
- Editor: May write, edit, publish, and delete posts of any user. They can manage comments, tags, categories, and upload files.
- Subscriber: The most limited WordPress user role. Subscribers can edit their user profile and post comments without needing approval.
- Contributor: A Contributor may create, edit, and delete their own posts but not posts which have been published. Another qualified user must publish their posts.
- Author: Can create, edit, publish, and delete their own posts.
Settings
The “Settings” link in your navigation panel contains a number of configuration sections that are crucial to managing your WordPress website. Be sure to go through each one carefully.
Settings Options
- General: Basic settings for your site, such as your Site Title, Site Language, and Timezone.
- Writing: Settings to configure aspects of your post-writing, like default category, default post format, and options for the “Post via email” feature.
- Reading: This screen offers settings related to your blog or post feed where published posts appear. Decide if your website’s frontpage/homepage displays the post feed or a static page, how many posts appear before the pagination button kicks in, and other options for how visitors’ syndication feed interacts with your content.
- Discussion: Here you can control aspects of incoming comments, pingbacks, and trackbacks.
- Media: WordPress has 4 default image dimensions for adding images to posts or pages: Full size, Thumbnail, Medium, and Large. Here, you can change the default max Thumbnail, Medium, and Large dimensions and also choose how your media files are organized within your Media Library.
- Permalinks: Permalinks are how your posts’ and pages’ URL structures will appear. Choose from one of the “Common Settings” or create a Custom Structure.
- Privacy: Let WordPress help you create a Privacy Policy page.
After installing a plugin, the plugin’s own settings link may appear within your WP Dashboard’s “Settings” navigation link.
Success! You did it!
You’ve chosen a domain, secured webhosting, installed the WordPress platform, installed a theme, and breezed through an introduction to your WordPress Dashboard area. You’re all set to begin creating content and sharing your passions with the planet.
Have a few more moments to spare? There are a number of simple settings you can configure and plugins to install right away which will make your life a lot easier down the road! Do yourself a favor and ensure your shiny, new site is setup for success here: Essential Setup Steps after you Install WordPress
And, for an ever-growing list of our favorite blogging resources that we use ourselves, check out our Resources page.
Have any questions? Don’t hesitate to let us know in the comment form below. We’d be happy to help!
Additional resources to optimize your site
What’s the difference between WP.org and WP.com?: We break down the differences between the similarly named WordPress.com and WordPress.org.
How to monetize your website to earn money: Helpful resource for ways to monetize your website in order to earn a little dough!
How to add Google Analytics to your WordPress Site: Google Analytics is a free, must-have tool for any blogger to help track & analyze your traffic!




I love your themes especially Rosemary but Good Lord, there’s always a payment 🙁
Hi! I have a five year long blog and I so want to install your Oleander theme but I’m terrified I will lose all my content – do you have anyone you can recommend to install themes? Thank you so much!
Hi there,
I’ve replied to your email with more details, though also wanted to reply here 🙂 If you’re currently running a WordPress.org blog all of your content should be safely saved in your WP database which is hosted on your server. One of the beautiful things about WordPress.org is that you can install and activate another theme and all of your posts, pages, images, etc. will be right there. We like to recommend regularly making backups of your WP database to be doubly-sure your content is safe, though.
While we don’t have a freelancer we personally can recommend for installing themes, we like to encourage customers to take a look at the installation article and see if it’s something they feel comfortable doing themselves ( Oleander’s is here: https://solopine.ticksy.com/article/5898/ ). It’s quite easy!
Cheers!
can you help? ive downloaded one of your themes and dont know how to download it to my account with blue host? im so confused and am about to give up. i have the theme rosemary
Hi Jordyn,
We’d be happy to help! Have you installed WordPress onto your Bluehost server yet? If you haven’t installed WP yet, Bluehost has a video on how to install the WP platform here: https://my.bluehost.com/cgi/help/wp_install
Once you’ve installed WP and you can access your WP Dashboard, you can then follow the theme installation steps for Rosemary in this article: https://solopine.ticksy.com/article/3821/
If you find yourself with any questions with the theme, you’re very welcome to head over to our support site at https://solopine.ticksy.com and open up a new support ticket. We’d be happy to assist.
Cheers!
Hi there,
I would like to know whether it’s possible to get a domain name, get the theme (i’m interested by the Laurel one) and work on it, but host it later on. I would like to work on my blog for several months before i put it online.
Thank you
Laura
Hi Laura,
To work on WordPress without hosting it would require that you set up a localhost on your computer using a program such as WampServer. You can check out a tutorial on how to do this here: http://webdesignerwall.com/tutorials/installing-wordpress-locally
Alternatively you can get hosting and put your site in “Coming soon” mode while you work on it behind the scenes.
Cheers!
Thanks a lot
Hi there,
I’m interested in the Sprout and Spoon theme. I currently already run a food blog: sophgordon.com which is currently on Wix. I am however looking to move over to WordPress and have fallen in love with your theme. How easy will it be for me to transfer over i.e. all my content etc. Also as I already have a domain, do I link that after I’ve put all my content up? Any help would be hugely appreciated!
Thanks,
Soph
Hi Soph,
We unfortunately don’t have much experience with the Wix platform or transferring content from Wix, however it looks like there are some good tutorials on how to go about it. For example: http://www.wpbeginner.com/wp-tutorials/how-to-properly-switch-from-wix-to-wordpress-step-by-step/
You would first want to get started with your self-hosted WordPress site and get that setup. If you have a domain that you’d like to keep, I believe your webhost would likely have you setup your WordPress site on a staging site (different web address than your desired domain).
Then, most forums seem to recommend transferring your Wix content over to WordPress by using the RSS feed. The above tutorial has a good walk-through with how to do this.
Then, once you’ve transferred everything over to the WordPress site, your webhost should be able to help you re-direct everything to your desired domain/web address.
I hope this helps!
Cheers!
Hey!
Thanks so much for getting back to me. So I’ve read the link you sent – super useful, will get started now! One thing, do I download and create the WordPress site first, inc the beautiful theme, and then upload my content..?
Thanks!
Hi Sophie,
I would definitely setup your WordPress site first before beginning to transfer content over from Wix.
It may be easiest to also install your preferred WP theme at that time (before transferring content) as you’d then be able to see how the site will fill out with your content as you transfer it.
Cheers!
Hey!
Ok great and do I need a host if I’ve already got a domain, or can I go ahead and install the theme to my account?
Sorry absolute WP rookie! X
Hi Sophie,
I believe Wix hosts your site for you on their own servers? If so, I don’t believe they’d let you install the WP.org platform onto the server.
You would need to first secure web hosting from another source (we have some recommendations noted above: http://solopine.com/how-to-start-a-blog/ ). Then you can follow the steps above to install the WP platform onto your server. Most webhosts have a “1 click install” button for this. From there, you can install your preferred WP theme onto your WP platform via the dashboard.
If you do decide to go with one of our themes, we have theme installation guides available. For example, here’s Sprout & Spoon’s: https://solopine.ticksy.com/article/7538
If you find yourself with any questions about this process, you’re welcome to shoot us an email via our contact form ( http://solopine.com/contact-us/ ). It may be easier to chat via email than this message thread 😉
Cheers!
dear solo pine…
I am mistaken in buying a theme item for a creative market, for the theme of oliander paid 2 times and my balance is reduced .. I hope you can give a refund or if you do not want to refund I just hope your solo pen can give one more theme for the loss of payment for The same Orilander theme
Hi there,
Thanks for reaching out! You’ll want to get in touch with Creative Market’s support team (https://support.creativemarket.com/hc/en-us/requests/new). They are the ones who handle all of their marketplace’s payment transactions 🙂
Cheers!
Hi Solopine!
Your themes are all so nice but I have one question about the Hemlock one. You note states it’s not compatible with wordpress.com but only .org. What’s the difference?
Thank you very much
PS: I’m new to all this!
Cynthia
Hi Cynthia,
WordPress.org is a free, open-source platform that is installed on a your webhost’s server. All you need to do is secure webhosting from one of the hundreds of webhosting companies online (like Bluehost, Media Temple, GoDaddy, etc.). All of our themes and themes for sale on marketplaces online are essentially created to be used with this WP.org platform.
Alternatively, there’s a similarly-named WordPress.COM which will host your site for you on their own servers. They’re a privately-owned business. They will only let you use themes from their own directory, not purchased themes like our own.
I believe the only exception to this rule is if you purchase their “Professional” or “Business” plan. In that case, they’ll let you use outside themes like our own. This is something that customers have recently let us know, though we can’t 100% confirm that WP.com’s “Pro” plans will let you use outside themes.
Please don’t hesitate to let us know if you have any questions! 🙂
Cheers!
I have had Willow since the day it came out, I LOVE IT!
So happy to hear it, David! 🙂 Thank you!
Thanks. Good article
Cheers!
Hi. I am interested in the Hemlock template. i wanted to know. If the articles on the blog are written by different contributors, will there be a hyperlink for each name that would come at the bottom of the article and then if it is clicked it will take the reader to all articles by that author?
How does that work ? Do I have to write some code for the same ??
Thanking you.
an aspiring blogger
Hi there,
This is definitely possible to do if each post author has a WordPress ‘User’. When a post is written, you can choose the post author from the User drop-down menu to assign that author to the article. Then, when a visitor clicks on the author’s name link, it will take them to an archive page with all the posts published by that author. No code necessary 🙂
If you decide to go with Hemlock and have any questions about how to do this, you’d then be very welcome to open up a ticket at https://solopine.ticksy.com . We’d be happy to walk you through the process.
Cheers!
I am new to blogging, I had someone set me a blog on my blue host account how i get rid of rid of the current site under construction and replace it with sprout and spoon. If I am new to wordpress will it be hard to understand it. I want to also to post recipes and be also blog
Hi Cynthia, It sounds like you already have your webhosting all setup and the WP platform installed which is great!
If you were interested in using Sprout & Spoon, you would need to purchase a theme license for it (there’s a “Buy Now” button on its theme page here: https://solopine.com/theme/sprout-spoon/). Once you’ve purchased a license, you can then download your Sprout & Spoon theme.
From there, we have an article with a guide on how to install the theme onto your WordPress and then how to begin setting it up (https://solopine.ticksy.com/article/7538).
We also have lots of other guides for doing different things in Sprout & Spoon here: https://solopine.ticksy.com/articles/100003353/
A theme license purchase automatically comes with 6 months of technical support in case you have any questions at all about how to use Sprout & Spoon. It allows you to open up support tickets with us at https://solopine.ticksy.com .
Once you’ve finished setting up your Sprout & Spoon theme, creating your posts and recipes, etc. and you’re ready to reveal it to the world, you can then disable the “Under Construction” feature so that the world can view your website 🙂
If you have any questions about Sprout & Spoon or the process before purchasing, please feel free to email us via our contact form here: https://solopine.com/contact-us/
Cheers!
Hello again, Are there any books you suggest for wordpress.
Hi Cynthia,
I’m afraid I don’t know of any books I’d recommend, though there are lots of free online resources which go over how to use the WP platform. For example: http://www.wpbeginner.com/
Cheers!